How to Upload a Mission File of Arma 3
Mission Making for Arma 3
In MC, we use a mission framework. This is an already made mission for you to open and edit. Most of the work required to have a functional mission is already done in this framework. Y'all just have to tweak information technology and add some objectives.
Important:
When editing missions, it is very like shooting fish in a barrel to accidentally add actress dependencies, both from client-side mods like JSRS, or from maps y'all are not consciously using. To aid with avoiding this, at that place are several options you accept:
- Have a split case of the Modernistic/Coldwar/SF repo that uses the same mod dir and server URL as the one yous play with, but just don't load the actress mods,
- Build the mission using all the mods (inclduing e.g. Loving cup Terrains core and Jbad) and carefully don't use external assets. This is very hard to pull off, and you lot volition have to test using a trimmed modlist anyway.
Editing source files
An Arma mission can in theory be built without ever doing any SQF editing, but sooner or later y'all will discover yourself tweaking this or that. For case, using either of the assignGear scripts volition crave some text file editing. Editing SQF can exist daunting, since its syntax is weird at best, and Arma'due south error reporting is abysmal. Thus, having a expert editor that you are comfy with using is of import.
If you lot are completely new to this kind of code editing I recommend using notepad++ and getting the SQF syntax highlighting add-on.
If yous are already using VSCode, the post-obit two extensions may prove very useful:
- SQF Language
- SQF Lint
If y'all are using (yard)vim, like integration is bachelor through ALE.
Download, unpack and ready the Example Mission and Extra Scripts
- Download the MC framework. Brand sure to always apply the latest release.
- Unpack the ZIP into the Arma 3 missions folder.Open missions folder in explorer. The file path volition wait something similar this:
C:\Users\klausman\Documents\Arma 3\mpmissions
Note: If the folderMPMissionsdoes not exist, create it.
The Zippo will comprise a folder namedmcfw-0.0.ane.cypheror similar. Unpack it to thempmissionsfolder and rename it tomcfw.Altis:

- Open the Arma 3 mission editor.
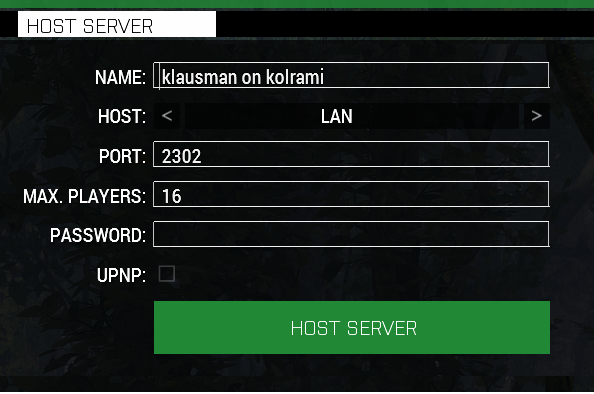
Start Arma 3 with all of MC'south add-ons enabled. And so navigate yourself to the Multiplayer tab in the main menu. ClickHost Serverand set Host to LAN:
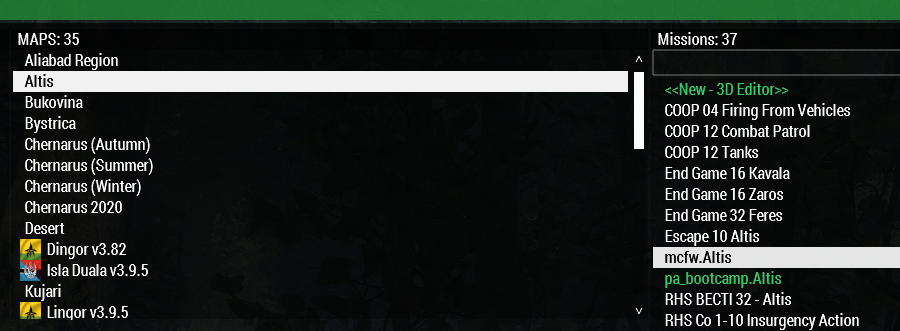
In the adjacent card, find the framework missions by selecting Altis as map, and and then selecting mcfw.Altis in green color. Now click the3D Editorbutton on bottom right. Arma will load the framework mission into the Eden Editor.
Defining mission rules
We will be creating a re-create of the example mission, but you lot can select whatsoever map (Altis, Stratis etc.) you prefer.
To create a new mission:
- While
mcfw.Altismission is loaded in the editor, zoom all the way out on the map, and then you can encounter all items that are on the map. Hitting Ctrl+A to select everything. - Press Ctrl+C on keyboard to copy.
- On the toolbar at the top left of the screen, select new, select the map you desire, then hitting "New Scenario".
- In your new, empty mission printing Ctrl+5 to paste the previously copied objects. They will be pasted wherever your mouse cursor is, so picking a nice open and flat area nearly the player start location is best.
- In windows explorer, open the folder
mcfw.Altis.Select all files in that binder except formission.sqm, and copy the files (Ctrl+C) - In windows explorer open the folder of your new mission, found somewhere in
\Documents\Arma 3\mpmissions - Paste the copied files (Ctrl+V). Call up exercise non overwrite
mission.sqm.
You lot take at present created a new mission which contains all the MCFW features, settings, and pre-placed assets. Let's go on to work on this mission from now on, and then yous can go on the mcfw.Altis mission unchanged and gear up to be used for future missions.
Mission rules & info are divers in several places
- Modules placed in the 3d editor
-
init.sqf(constitute in\Documents\Arma 3 \MPMissions\missionname.mapname) -
clarification.ext(same folder) - Slotting Screen Parameters
- In the editor: Settings > Addon Options
Modules
Modules you find in the 3d editor asset browser nether Systems(F5). There are some pre-placed modules in the example mission already. Click on them to run into what settings they contain. You are of course free to tweak the settings, but think these default settings is what MC is used to, alter information technology too much and players volition be confused.
Annotation: A lot of settings that used to be configured via modules are now CBA settings (see below). While some modules might nevertheless piece of work, they volition likely emit warnings about their deprecation. When in dubiousness, enquire in #mission-making on Discord.
init.sqf
In init.sqf you can enable or disable certain MCFW features, or tweak the values.
The commented text above each block of lawmaking should explain what it does.
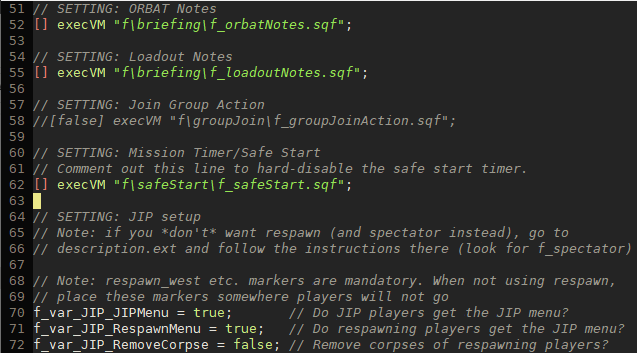
Due east.g. you can disable f_safeStart by commenting out (//) line 64.
description.ext
In description.ext y'all can prepare the mission's conference proper noun, description and loading image. There are a few other features in here that can be tweaked but it's rather advanced and non very necessary, so I'll go out that up to yous to notice.
Note that the mission's championship for the mission option screen is defined somewhere else: In the 3d editor's toolbar click Attributes > General. When making an updated version of your mission e'er update this proper noun (i.e. include a version number).
Parameters
Parameters are mission settings that can be tweaked in the slotting screen, by pressing the Parameters button at the top. These parameters are defined in description.ext, starting at line 114. You may tweak the default parameters as you want, or activate features.
A few more notes on specific features:
Safety start disables player weapons for the kickoff v minutes of a game. It'southward enabled per default.
The logged/voted admin tin turn information technology off in-game by opening the map screen and clicking 'Admin' under 'Briefing'.
Yous can turn safe start off entirely in init.sqf by commenting out line 62: [] execVM "f\safeStart\f\_safeStart.sqf";
JIP aka bring together in progress allows players who join mail service mission showtime to teleport to their squad mates. You can tweak the settings in init.sqf line 48: // SETTING: JIP setup
If you wish to change the time of day or the weather, that is best done in the mission editor: in the 3d editor, go to toolbar, and click Attributes > Environment.
Tip: For night time missions, check if the moon is visible, it makes a huge difference in visibility for the players, peculiarly without NVGs. This is a bit of a pain to do in the base Eden editor, just Eden Enhanced adds nifty trivial icons of moon phases next to the day selector in the mission settings (Attributes > Environment).
Add together-on Options
CBA comes with a framework so module makers can easily add settings to their mods, without everyone reinventing the wheel and settings beingness all over the place. This is especially useful for mods like ACE that have well over a hundred settings that players and units can tweak. As of mid-2019, most modern mods apply CBA settings, so you should definitely become through the settings to familiarize yourself with the basic setup. Note that some settings are enforced on the server and can't be inverse by players or mission makers.
The CBA site has a good overview of how the bones Client/Mission/Server settings and overrides work.
If you accept specific questions about a certain setting and what it influences gameplay-wise, #mission-making is the place to ask.
Placing role player units
In the framework example mission, well-nigh required player units have already been placed downwardly for yous, in all 3 bachelor sides: BLUFOR, OPFOR, Contained.
You should utilize these units for your mission also: Remove the units you don't need, copy paste units you demand extra of. To keep things unproblematic for yourself, and making it easier to reuse role of your mission for a next mission, I recommend to e'er use BLUFOR for players (exception: TvT missions). If you desire the players to play as CSAT or Russians, we will simply change the BLUFOR player uniforms and weapons.
Sides vs. Factions
In Arma parlance a side is the highest level of group of units. The four chief sides are west (aka BLUFOR), eastward (aka OPFOR), resistance (aka Independent) and noncombatant. resistance can be friendly to both eastward and westward, or only one, or neither. This is a base mission setting (Attributes > General > Misc > Independents Allegiance).
Too a unit's side there is also its faction. This is a finer-grained stardom and not exclusive. For example, NATO units in the base game have the faction BLU_F, whereas APEX NATO units are BLU_T_F. Furthermore, there is a BLUFOR-sided FIA (BLU_G_F), an OPFOR-side i (OPF_G_F) and one on the Independent side (IND_G_F).
On top of this, some of our mods have nonetheless more than faction, east.g. 3CB BAF Units has units with a faction of UK3CB_BAF_Faction_Army_Arctic.
Important: Only use the factions BLU_F,OPF_F, IND_F and the 3 FIA variants ((BLU|OPF|IND)_g_f). MCFW uses factions to effigy out who is who. The only factions that are defined per default are the ones just mentioned, so unless y'all are an advanced user, only employ these factions for ANY units (exception are vehicles, of grade). This is a limitation inherited from the F3 version of the framework, and may change in a future version.
Nosotros volition use the assignGear script to change the default Arma 3 NATO soldiers into something more interesting.
Similar I said before, nosotros volition be using and copy pasting the pre-placed units in the instance mission. This is because as well the correct faction, in that location are a few other things that take to be set up properly on a player unit to function 100%. Copy pasting prevents user errors and simply makes it easier for you. Let'due south look at everything that goes into setting up ane unit.
Double click any pre-placed NATO soldier to open its attributes.
-
Variable name(e.1000.
UnitNATO_A2_AT): A name that the script code tin can use to find this unit. -
Init: Lawmaking entered hither will run on every car as they join. We employ it to trigger 2 scripts: Insignia &
assignGear.GrpNATO_ASL = group this; ["rat",this] call f_fnc_assignGear;The commencement part (
GrpNATO_ASL = group this;) is required for the insignia (e.g.A1or the medic symbol) characteristic. The 2d function, (["rat", this] telephone call f_fnc_assignGear;) calls theassignGearscript, to change the player compatible and weapons. How to change the gear I'll explain afterwards, for now yous must know that the first part of the code, which is between quotation marks defines which form this unit will be ("rat"). That's the part you want to be irresolute. What the course mean and how we'll apply them is explained later. -
Playable: a tick box to brand the unit selectable for players in the slotting screen. The 'player' box is not used in multiplayer. -
Role description: How the unit will be chosen in the slotting screen. You tin can useOffice@Squadnameon the leader of a group to set the name of the squad in the slotting screen. -
Last note: The order of playable units in the slotting screen depends on when the unit was created in the editor. Starting time created units appear on the top of the list. Tweaking the unit of measurement order in slotting screen is very annoying, but can be done past cut and pasting the quads in the lodge the should appear on the Slotting screen. Another choice is to move them between layers in the editor.
Changing player loadouts
Note: There is a separate document explaining the default (simple) assignGear, as well as some documentation on the older, more than complex variant.
Placing AI opponents
Editor placed AI might appear to exist the 'default' or 'normal' manner of placing your AI opponents, but it is actually the worst thing you can do. Also many AI active in your mission at once seriously hurts performance in a multiplayer environment.
Our goal is to limit the amount of active AI as much as possible. We practice this using AI spawn scripts, which only create the AI one time players get nearby.
Murk spawn script guide from klausman:
Murk HowTo
And another one from NyteMyre:
https://docs.google.com/document/d/1ofsbiG1mL7bdh1vWbIYE3BzGDZbkhm4MSTzWjtkCuv8/view
Testing your mission
To make the mission ready to play on the multiplayer server, you must salve the mission as .pbo file. You do this in the editor toolbar bill of fare
Scenario > Consign to multiplayer.
Your file will be saved in this folder:
C:\Programme Files\SteamLibrary\steamapps\common\Arma three\MPMissions
The naming convention for our mission files is as follows:
MC_COxx_missionname_version.mapname
For role player vs player mission, replace CO with TVT, for missions that require a Zeus, use Z.
E.k. mc_co46_insurgency_v2.Tanoa
Of import: The role before the map name must not contain whatever dots (.), since this will misfile Arma and the mission volition not be visible on the server. It is best to just utilise A-Z, a-z, 0-9 and _ for mission names.
Take 1 of the Arma team upload your mission to the server. The y'all should test the mission on the server, ideally several days (and several times) before mission day. Feel complimentary to ping people in #lookingtoplay for volunteers.
We likewise have a checklist of items that we accept found are easily overlooked/untested, that and so break the mission at event time.
Getting a timeslot
To get a timeslot for your mission, inquire the Arma team for a timeslot and briefly outline your mission (which repo (Modern/Coldwar/SF), name, era, factions, histrion count). The mods volition and so go back to you and effigy out a appointment to host your mission. Note that they will inquire if you take tested the mission on-server with others.
At that place are a few considerations for missions:
- Typically, new mission makers host on Friday or Saturday for a few times before getting a Sunday slot.
- Small missions typically happen on Fridays. Pocket-size here means either short time-wise (<one.5h or so) or with few player slots (<20).
- Recurring missions similar Antistasi, or longer series of missions, like Two Sierra, also happen on Fridays, to non crowd out the bigger event missions.
- We typically don't reserve dates further than 2 weeks into the future.
Source: https://www.misfit-company.com/arma3/mission_making/guide/
Enviar um comentário for "How to Upload a Mission File of Arma 3"